Creating a New Link
Use the link wizard to define a link from a Navigator item, graphic view, or query-based view that opens the targeted workspace in the same or new windows.
Complete these steps to create a new workspace link.
-
Create a new link:
-
Click Link To >
 Link Wizard.
-
Select
 Create a new link and click
Next>.
Create a new link and click
Next>.
-
Click Link To >
-
Select the link type and target:
-
Select one of the following link types and click Next to open
the Workspace Link Wizard - Target Workspace window.
Dynamic
The dynamic link method offers flexibility in your choice of workspace targets. A dynamic link is similar to a relative link and, with some link definitions, behaves in the same way. What is different is that the path to the target workspace uses a system identifier passed by the source query-based view. The identifier can be managed system name, IP address, host name, Systems Management Facilities ID, or Product Code.  Absolute
An absolute link stores the managed system name of the chosen target, and goes only there. For example, if you target the Databases Information workspace on the MS SQL Server branch for the Paris computer, that is the workspace that will open. The Database Information workspace for the Geneva computer is not considered.
RelativeA relative link stores the type of source workspace and target workspace. The resulting link is available from any workspace that is of the same type. If more than one workspace fits the definition of the target, you are presented with a list of workspaces to choose from. For example, a link built from the Paris computer's Windows OS workspace to its Memory workspace will also be available from the Geneva computer's Windows OS workspace and link to its Memory workspace.If you are linking between Navigator views, relative linking is not recommended. Instead, use the absolute or dynamic method for links to the Navigator Logical view and other custom Navigator views. -
If you are targeting a workspace in a different Navigator view, select
the view from the Navigator View
 list.
list.
-
In the Workspace pane, select the workspace to target; or, if
this is a dynamic link and you want to more generally classify the link,
select
 This link does not target a specific workspace.
-
If you would like the workspace to open in a new window instead of
replacing the current workspace, select
Always open target workspace in new window. If you are running
the browser client and your browser supports tabbed pages, the workspace
will open in a new tab.
-
Select one of the following link types and click Next to open
the Workspace Link Wizard - Target Workspace window.
- If this is an absolute or relative link and you want to refine the link definition, click Next and add the expressions.
-
If this is a dynamic link, the Target Filters window is displayed for you to
select the type of identifier for the target and specify the value to use:
- Click the identifier to use: Managed system name, Hostname (distributed systems only), IP address (distributed systems only), or SMFID (z/OS-based systems only) If you are not sure which one to choose, click Managed System name.
-
Click Modify Expression to open the Expression Editor, then
click Symbol. The list is a reverse hierarchy of available
 symbols starting from the source context
and the current Navigator item and ending at the root Navigator
item.
symbols starting from the source context
and the current Navigator item and ending at the root Navigator
item.
-
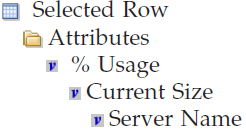
Select a symbol that provides the value for the
system identifier. For example, Server Name will provide the
value needed for Managed system name when the link is launched.
You might need to open different branches to locate a symbol for the
type of target filter chosen.
-
Click OK add the detailed name for the attribute to the
Expression Editor.
$kfw.TableRow:ATTRIBUTE.NTLOGINFO.ORIGINNODE$ -
Click Evaluate to verify that the variable resolves correctly.
The Value shown must be valid for the identifier type you specified. For
example, for a computer named MARVELUSER,
Primary:MARVELUSER:NTis a valid Windows OS managed system name and MARVELUSER is a valid host name. - If no value is displayed or you get a syntax error or a value that does not identify the system, click Clear and select a different symbol or try another identifier.
- In addition to Symbol, you can click Operator and Function to find and select other elements to complete the expression. When you are finished with the expression, click OK to insert the expression in the current target filter row. Note that expressions can evaluate to patterns using the asterisk (*) and question mark (?) wildcard characters. This allows for pattern matching filters.
-
If the target workspace was updated or is new for the latest version of
your monitoring product and your environment has a mix of versions, you
can disable
Allow this link to target any version of the target workspace or
leave it enabled: Enabled is the default setting.
The target workspace can be chosen for any version of the monitoring
agent. If the query for a view specifies attributes that are available
only in the newer version and the target workspace is for an older
version of the monitoring agent, no values will be returned for those
attributes.
 Disable the option if you want
the link not to be offered for target workspaces on earlier versions of
the monitoring agent.
Disable the option if you want
the link not to be offered for target workspaces on earlier versions of
the monitoring agent.
- Click Next and refine the link definition; or click Next twice and review the summary.
- In the Workspace Link Wizard - Summary page, review the summary, then click Finish to save the link definition, Back to return to a previous window to make additional changes, or Cancel to close the Link Wizard without saving your changes.